How To: Bind a FlySky Receiver and Transmitter (Remote)

Maybe you’ve upgraded to a new radio, maybe you plugged something in where you weren’t supposed to, or maybe your RC car likes to pretend it’s a submarine and spend more time underwater than it does on the track. For whatever reason, you have just bought a new receiver, and you need to make it work with your controller.
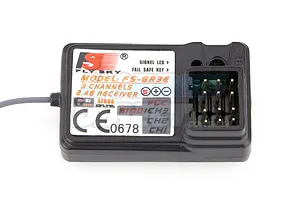
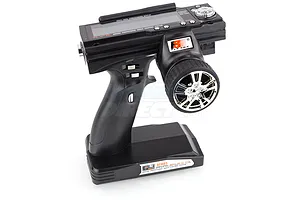
Luckily, we’ve got you covered. One of the most popular and factory-spec 3-channel receivers is the FlySky GR3E, often paired to popular controllers like their GT2, FS-GT2B, FS-GT3B, and many others. This guide will walk you through the simple process of linking your FlySky radio gear.
What You Will Need
Before you start, make sure you have the following items ready on your workbench:
A bind lead (bind plug): This is usually supplied with your receiver, or hidden in the bottom of the box your car came in alongside the manual.
Fully charged batteries: Ensure you have fresh or fully charged batteries in both your car and your controller. Low voltage can interrupt the binding process.
A small tool: A pen tip or a spare body clip is handy for pressing recessed bind buttons.
About 30 seconds: That's all it takes!
More of a visual learner?
Watch Hamish run you through the steps in this video.
How to Bind Your FlySky Receiver
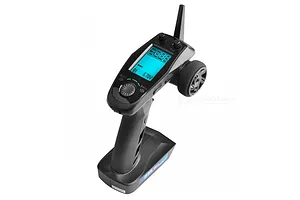
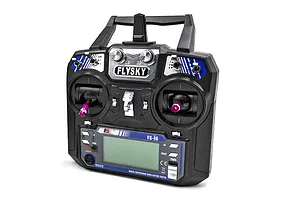
Follow these steps to successfully bind your FlySky receiver to your transmitter. This process works for most FlySky surface models, including the FS-GT5 and the FS-i6.
Step 1: Insert the Bind Plug
Locate the channel three (VCC/BIND) port on your receiver. Insert the bind plug securely into this port. Make sure the pins line up correctly with the plug.
Step 2: Power On the Receiver
Turn your RC car (and the receiver) on. The red LED on the receiver should now be flashing continuously. This rapid flashing indicates that the receiver is actively in binding mode and looking for a signal.
Step 3: Power On the Controller in Bind Mode
Locate the bind button on your transmitter. Press and hold the bind button, and then switch the controller on. Pro tip: The bind button on some models, like the GT2, is recessed. We recommend using a pen or a body clip to press the bind button to avoid frustration.
Step 4: Verify the Bind
The green LED on the controller will flash, indicating that it is in bind mode. Look back at your receiver — the LED will change from flashing to solid red. A solid red light means the bind was successful and the two devices are communicating.
Step 5: Power Off and Remove the Plug
Turn the car off first, followed by the controller. Once everything is powered down, remove the bind plug from the receiver. Keep the bind plug in a safe place, like your toolbox or My Garage, for future use.
Step 6: Test Your Connection
Turn everything back on to test the connection. Always remember the golden rule of RC: turn the controller on first, then the car. Check your steering and throttle to ensure everything is working correctly. You’re ready to go race!
Troubleshooting Common Binding Issues
If your receiver LED continues to flash or you have no control after following the steps, check the following:
Battery voltage: Ensure both the transmitter and receiver batteries are fully charged. A weak battery can prevent a successful bind.
Plug orientation: Check that the ESC or battery plug is inserted into the receiver with the correct polarity (signal, positive, negative).
Distance: Keep the transmitter and receiver close together (within half a metre) during the binding process to ensure a strong signal.
If you're looking to upgrade your radio gear or need a replacement receiver, check out our full range of Transmitters & Receivers to find the perfect fit for your RC fleet.
Aaron
Content Creator & Marketing Coordinator · Hobbies Direct
Frequently Asked Questions
The bind plug connects the signal and negative pins on the receiver's bind port. This tells the receiver to enter binding mode and look for a new transmitter signal when powered on.
A flashing LED means the receiver is not connected to a transmitter. This usually happens if the binding process failed, the transmitter is turned off, or the batteries are too low to establish a connection.
No, the receiver will remember the bind to your transmitter even when powered off or when the batteries are removed. You only need to bind when using a new receiver or transmitter.
Yes, most multi-model FlySky transmitters like the FS-GT5 allow you to bind multiple receivers. You can save different vehicle profiles in the transmitter's memory.